Archives For November 30, 1999

I’m the developer of BlackBerry Jam Asia 2013 Conference App. In this Category you’ll find some posts about Patterns used and Tips or Tricks.

JSON vs SQL

December 8, 2013 — Leave a comment

This isn addon to my last article Conference App Secrets #3: JSON vs XML from my series ‘Conference App Secrets’.

Before going on, you should

I found out that using JSON instead of XML can be up to 30 times faster for the use-cases from my last article: reading/writing 10’000 addresses or reading/writing 119 speakers. For applications where you get data from REST or WebServices, cache them local and use them in-memory it’s very common to read/write to your file-based cache. My Conference Apps are going this way: caching and queuing, work in-memory with GroupDataModel. Next articles will explain HowTo Search and Filter.

From discussions in forum I was asked to compare the speed if using a SQLite Database on your BB10 Device.

I did this and enhanced my sample app to compare the execution times also using SqlDataAccess.

JSON vs SQL in the UI

In this article I won’t discuss the QML UI, because I was using same patterns as already described for JSON vs XML. Here are the screenshots.

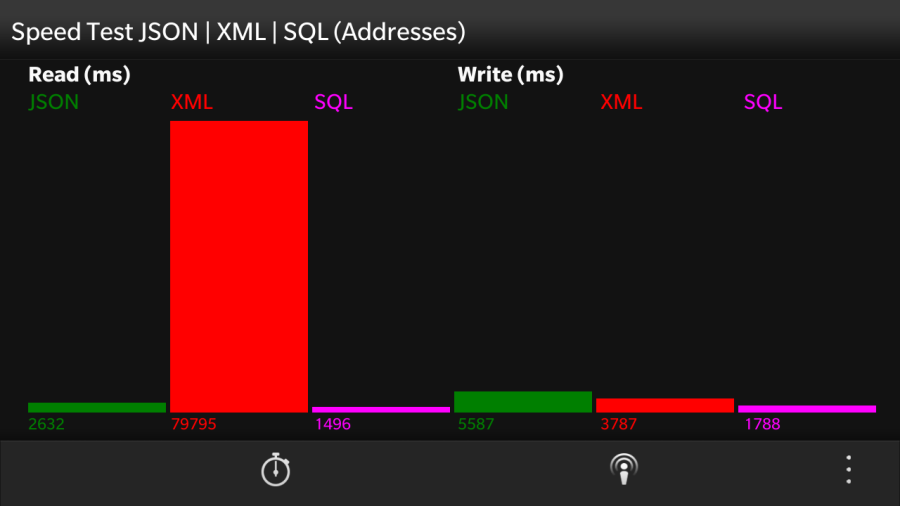
Reading/Writing 10’000 Addresses I added two Bars for SQL:

IMG_00000021

From the values you can see that reading 10’000 addresses using SQL is even faster then JSON:

  • READ JSON:   2632 ms
  • READ XML:   79795 ms
  • READ SQL:     1496 ms

Same for writing: SQL is the fastest way to do it

  • WRITE JSON:   5587 ms
  • WRITE XML:     3787 ms
  • WRITE SQL:     1788 ms

Cascades does a really great job not only for JSON but also using a local SQLite DB.

For the 119 Speakers I added an ActionItem to push the SpeakerSQLPage.qml comparing execution times of JSON and SQL:

IMG_00000022

Now the results are different: Reading from JSON or from SQLite is similar. Doing some executions in series sometimes JSON is faster, sometimes SQL is faster.

Writing the 119 Speakers into the DB took around three times longer as writing them into a JSON file. Seems there’s some initial overhead using a SQL DB, so inserting less records can be slower then JSON. If you’re doing the write async, the user won’t notice this.

Rule #1: if caching data, use JSON or SQL – both are much faster then XML

If you take a look at the file sizes needed, the JSON or XML files storing the 10’000 addresses occupy 4 MB from your disk space where the SQLite only needs 1.7 MB

Rule #2: if caching a lot of data: SQL uses disk space more efficient then JSON or XML

But there’s a drawback using SQL:

  • more and complexer code
  • more errors to deal with
  • fragile if you’re not the owner of the API providing the data

Business Logic (C++) to deal with SQL data

Now let’s see what happens at C++ side.

Prepare your app to use SQLite DB

We have to add some includes into applicationui.cpp:

    #include <bb/data/SqlDataAccess>
    #include <bb/data/DataAccessError>
    #include <QtSql/QtSql>

Some constants will help – per ex. the Database Name and Table Names. (You’ll find some more Strings in the sample where you should use constants in a real app. It’s up to you …)

    const QString DB_NAME = "testdata.db";
    const QString ADR_TABLE_NAME = "addresses";
    const QString SPEAKER_TABLE_NAME = "speakers";

We also have to add some code to the Header File (applicationui.hpp) to manage a SQLite DB:

#include <bb/data/SqlDataAccess>
private:
	....
	bool mDatabaseAvailable;
	bool initDatabase();
	bb::data::SqlDataAccess* mSQLda;
	....
};

At Startup we initialize the database and open the connection:

bool ApplicationUI::initDatabase() {
	QSqlDatabase database = QSqlDatabase::addDatabase("QSQLITE");
	database.setDatabaseName(dataPath(DB_NAME));
	if (database.open() == false) {
		const QSqlError error = database.lastError();
		// you should notify the user !
		qWarning() << "Cannot open testdata.db " << error.text();
		return false;
	}
	// create the Connection
	mSQLda = new SqlDataAccess(dataPath(DB_NAME), this);
	return true;
}

Read all data from SQLite DB

Reading all data from SQL is really easy:

	QString sqlQuery = "SELECT * FROM " + ADR_TABLE_NAME;
	QVariant result = mSQLda->execute(sqlQuery);

The result from the Query is a QVariantList containing QVariantMap for each Address.

So this is similar to JsonDataAccess.

Write (INSERT) all data into SQLiteDB

Writing all data to a SQLite DB means you have to INSERT from a QVariantList containing QVariantMaps for all your addresses / speakers / … INTO the DB.

Inserting all data into the DB at first you have to think about replacing current data. Writing to a JSON file the content was automatically overwritten. If you want to replace all data of a Table you have to DROP an existing Table:

    mSQLda->execute("DROP TABLE IF EXISTS " + ADR_TABLE_NAME);

As next step you have to CREATE the TABLE before you can INSERT any data. If you know the structure of your data you can use a hard-coded QString to do this. But we’re talking here about data getting from REST services in JSON or XML format. If you own the REST service and control the API you also can do it the hard-coded way. If you don’t know exactly what you’re getting, it’s better to dynamically create the Table.

If you know that all data you receive have the same properties, you can simply get the QVariantMap from first row:

	QVariantMap addressMap;
	addressMap = allAddresses.at(0).toMap();
	QString createSQL = createTableCommandForAddresses(addressMap);

Then loop through all keys of your map. If some properties are known, you can add some special behaviour like PRIMARY INDEX or special data types:

QString ApplicationUI::createTableCommandForAddresses(
		const QVariantMap& addressMap) {
	QStringList allAddressColumns = addressMap.keys();
	QString createSQL = "CREATE TABLE " + ADR_TABLE_NAME + " (";
	for (int i = 0; i < allAddressColumns.size(); ++i) {
		QString colName;
		colName = allAddressColumns.at(i);
		createSQL += colName;
		if (colName == "Number") {
			createSQL += " INTEGER PRIMARY KEY";
		} else if (colName == "Latitude" || colName == "Longitude") {
			createSQL += " DOUBLE";
		} else {
			createSQL += " TEXT";
		}
		if (i == (allAddressColumns.size() - 1)) {
			createSQL += ");";
		} else {
			createSQL += ", ";
		}
	}
	return createSQL;
}

If you don’t know data types it’s no problem to always use TEXT, because for a SQLite DB the Type is only a hint. After constructing the SQL command simply execute it to create the Table:

     mSQLda->execute(createSQL);

Now we can insert the data. The fastest way is to use a parameterized statement:

QString ApplicationUI::createParameterizedInsertCommand(
		const QVariantMap& rowMap, const QString& tableName) {
	QStringList allColumns = rowMap.keys();
	QString insertSQL;
	QString valueSQL;
	insertSQL = "INSERT INTO " + tableName + " (";
	valueSQL = " VALUES (";
	for (int i = 0; i < allColumns.size(); ++i) {
		insertSQL += allColumns.at(i);
		valueSQL += ":";
		valueSQL += allColumns.at(i);
		if (i == (allColumns.size() - 1)) {
			insertSQL += ") ";
			valueSQL += ") ";
		} else {
			insertSQL += ", ";
			valueSQL += ", ";
		}
	}
	insertSQL += valueSQL;
	return insertSQL;
}

… and execute this command:

    mSQLda->executeBatch(insertSQL, allAddresses);

Thanks to Cascades this insert is lightning fast: 1780 ms to insert 10’000 records from a one-liner 🙂

Searching StackOverflow HowTo optimize a bulk import into SQLite you’ll find many tips and discussions, but using Cascades ignore them: executeBatch() runs automatically inside a Transaction !

ATTENTION: This only works if all QVariantMaps match exactly the properties from your parameterized statement. This will work perfect for the Addresses, but will fail for the Speakers !

The Speakers JSON is optimized and only contains properties with values. This took the smallest amount of space and memory. Getting those properties from a QVariantMap is no  problem, because you can use defaults if the key wasn’t contained.

If you want to store all possible properties at first you have to make all QVariantMaps equal. There’s a helper method in the sample app to do this: firstInitSqliteSpeakers().

Please also have in mind that we’re using simple Maps with one level of data, where it’s easy to create a Table for. If using more complex data you have to carefully think about your SQLite Tables. As we’ve seen: SQLite is really fast, but can cause some overhead.

There’s no easy answer what will be the best. As always: it depends … 😉

Stay tuned for my next articles where I’ll go deeper into the data models and caching strategies for my Conference Apps.

Download and Discuss

The Sample APP is available at GitHub Open Source (Apache 2 License): https://github.com/ekke/cascades_json_vs_xml

There’s a Thread in the Forums, where you can ask or discuss.

Have fun with the sample app and copy/paste what you need to go your way to use JSON, XML or SQL to persist your data.

This is part #3 of my series ‘Conference App Secrets’.

This time I want to discuss some aspects of HowTo persist data to guarantee a fast-responding app.

I was asked why my conference apps are performing so incredible fast while getting Sessions or Speaker or searching. (Got many 5 star reviews because of this)

You should download the BBJam Asia Conference App to see it there in action.

The answer isn’t easy and will cover some more articles. Let me start to explain…

BBJam Asia uses a JSON DataModel

I’m using JSON to persist the data of my conference apps and there are many reasons. Using REST interfaces you still get many data from responses in XML format and in most cases you have to consume such data and cannot change the backend.

The first thing I’m always doing is to convert those XML data into JSON data before going on.

You’ll find all used datafiles of this sample app and sources at gihub: https://github.com/ekke/cascades_json_vs_xml

I cannot tell you details about the BBJam Asia Conference API, so I generated some mockup data:

  • 10’000 random addresses to have a large file to experiment with
  • 119 public available speaker data to have some conference-relevant data

The addresses I’m using are generated by a free service from fakenamegenerator.com I can highly recommend this service to developers if you have to provide prototype apps with data or if you want to test using large data sets. They even generate different data for the Country you selected and also GeoCoordinates.

The speaker data is a wordpress export file from another conference APP and contains real data from public available sites.

Addresses and Speaker data is in XML format. I’ll show you HowTo convert these files into JSON and explain WHY you should do this.

Both datasets can be found here:

assets_data

While developing and testing in many cases you have to take a look at those data and JSON is much easier to read as of XML.

Here’s one address in XML:

    <Address>
        <City>Lincoln</City>
        <Company>Record Bar</Company>
        <Country>US</Country>
        <CountryFull>United States</CountryFull>
        <Domain>AffordableShow.com</Domain>
        <EmailAddress>SharonSMcCall@cuvox.de</EmailAddress>
        <GivenName>Sharon</GivenName>
        <Latitude>40.722909</Latitude>
        <Longitude>-96.678577</Longitude>
        <Number>1</Number>
        <State>NE</State>
        <StreetAddress>3002 Poling Farm Road</StreetAddress>
        <Surname>McCall</Surname>
        <TelephoneNumber>402-310-0424</TelephoneNumber>
        <Title>Mrs.</Title>
        <ZipCode>68501</ZipCode>
    </Address>

and here the same address in JSON:

      {
         "City" : "Lincoln",
         "Company" : "Record Bar",
         "Country" : "US",
         "CountryFull" : "United States",
         "Domain" : "AffordableShow.com",
         "EmailAddress" : "SharonSMcCall@cuvox.de",
         "GivenName" : "Sharon",
         "Latitude" : "40.722909",
         "Longitude" : "-96.678577",
         "Number" : "1",
         "State" : "NE",
         "StreetAddress" : "3002 Poling Farm Road",
         "Surname" : "McCall",
         "TelephoneNumber" : "402-310-0424",
         "Title" : "Mrs.",
         "ZipCode" : "68501"
      }

So better readability is one reason.

If you’re using QML then you can easy copy / paste objects from JSON directly into your QML code like

var myAddress = {  …. the JSON object … } … myDataModel.insert(myAddress) ….

Sometimes this is useful for mockup data where you simulate inserting objects into List DataModels.

In most cases JSON datafiles are smaller then XML:

  • 10’000 addresses in XML: 6.7 MB
  • 10’000 addresses in JSON: 5.9 MB

If the XML is using many long property names the file size can be reduced much more, but sometimes if the XML structure is very complicated it may happen that a JSON file is larger then XML. (Take a look at the Speaker data)

Perhaps you already know that Cascades supports JSON very well, per ex. if using QVariants from C++ in QML where QVariantMap was mapped automatically to JavaScript Objects (== JSON). Perhaps this deep integration of mapping is the reason for ….

Speed Speed Speed 🙂

speed

© David Castillo Dominici | Dreamstime.com

Inside a conference app most times I’m reading data from cache and this is where JSON clearly wins over XML. Here are some values I measured using the 10’000 addresses:

  • READ JSON:  2’392 ms
  • READ XML:  71’342 ms

Rule #1: if caching data, always use JSON – this can be up to 30 times faster then XML

It’s curious: writing data to file JSON is something slower then XML. Here’s what I measured for the 10’000 addresses:

  • WRITE JSON: 5’255 ms
  • WRITE XML:   3’567 ms

The WRITE speed differences are marginal and you can do the WRITE async and work on while you’re probably waiting to get the data from READ.

In some cases you’re getting more data as you need. Take a look at the Speaker data exported from WordPress as RSS in XML format. Both file formats: XML and JSON aren’t easy to read and contain too much data in a complex structure. But it’s easy to workaround: as soon as you get the data from HTTP Response transform it and remove unneeded properties, which will give you even more speed. Here’s the measurement using the 119 Speakers:

  • READ XML:     378 ms
  • READ JSON:     76 ms
  • READ JSON v2: 23 ms

JSON v2 contains only the attributes you need in a less complex structure.

Rule #2: if getting complex data remove unused properties to get even more speed

It’s boring only to compare numbers, so let’s use Cascades to demonstrate the speed of JSON – based persistence or caching and see how easy it is to convert data between XML and JSON:

UI (QML)

The sample application is only using two QML files:

  • main.qml
  • MeasureSpeakerPage.qml

main.qml contains a NavigationPane displaying a Page to visualize the measurements of reading / writing the 10’000 addresses.

MeasureSpeakerPage.qml will be pushed on top to visualize the measurements of reading Speaker data from XML, JSON and JSON less properties.

Let’s take a look at the main.qml first. There are some attachedObjects:

  • SystemToast
  • ComponentDefinition
  • QTimer
attachedObjects: [
    SystemToast {
        id: infoToast
        ....
    },
    ComponentDefinition {
        id: measureSpeakerPageComponent
        source: "MeasureSpeakerPage.qml"
    },
    QTimer {
        id: myTimer
        property int usecase
        interval: 100
        singleShot: true
        onTimeout: {
            switch (myTimer.usecase) {
                case 0:
                    app.compareJSONandXMLaddresses()
                     eturn
                case 1:
                    app.compareJSONandXMLspeaker()
                    return
                ....
            }
        }
    }
]

We’re using the SystemToast as an easy way to let the user know if a process was started or finished.

While the first Page is defined directly inside the main.qml, the MeasureSpeakerPage will only be pushed on demand if the users starts an Action. To avoid unnecessary creation of UI Controls, we only define the component and create it dynamically before pushing on top.

The QTimer is used as a workaround to have a small delay between hitting the Action item and calling the process in C++. As we’ve seen above it takes a long time to read the 10’000 Addresses from XML: more then 1 Minute ! While executing this task we want to disable the Action items what was done async and needs some ms.

Without using the QTimer there will be not enough time to disable the ActionItems. Why ? Because we’re doing something you never never never should do in a real application: executing a long-running task on the UI Thread. While Network requests are async operations out of the box, reading a file isn’t and will block the UI.

The goal of this demo application is to let you feel the long execution time 😉

So I’m using the QTimer – workaround. Now disabling the ActionItems works as expected. Here’s how I have done this:

NavigationPane {
	id: navPane
	property bool running: false
	.....
	Page {
	    id: measureAddressesPage
		....
		actions: [
            ActionItem {
                title: "Measure Addresses"
                enabled: ! navPane.running
                ...
                onTriggered: {
                    navPane.running = true
                    ...
                    myTimer.usecase = 0
                    activityIndicator.start()
                    myTimer.start()
                }
            },
			... more ActionItems
		]

	}
}

All ActionItems will be disabled if a Task is running: I’m using a property from NavigationPane. As soon as an ActionItem was triggered, the property ‘running’ was set to true. Then the QTimer was started with a delay of 100 ms. Before the QTimer starts, the System has enough time to disable all Action Items. Because I only want to use one QTimer Object I added a property ‘usecase’ to know which task from C++ should be started.

How to get the information, that the task was finished ? We’re using Qt Signals / Slots: from C++ a signal was emitted and in QML we connect a function (Slot) to this Signal. The connection itself was done in onCreationCompleted{}.

You’ll find different Slots (functions) connected in the sample APP. Here’s a simple function showing a Toast, stopping the ActivityIndicator and setting the property ‘running’ to false:

function processFinished() {
    activityIndicator.stop()
    navPane.running = false
    switch (myTimer.usecase) {
        case 0:
            infoToast.body = "10'000 Addresses processed.\nread JSON ..."
            infoToast.button.label = "OK"
            infoToast.icon = "asset:///images/ca_done.png"
            infoToast.exec()
            return
        case 1:
             ........
            default:
                return
    }
}
onCreationCompleted: {
    app.conversionDone.connect(processFinished)
}

There are more complex Slots getting result values from C++ if measuring Addresses or Speakers.

Here are some screenshots to see how the results from measuring Addresses are displayed.

We start with an empty Screen:

IMG_00000016

Starting the Action “Measure Addresses” the ActionItems will be disabled, a Toast will be shown and an ActivityIndicator is running:

IMG_00000017

This is a long running task and can take up to 2 Minutes !

Getting the Signal that the task is finished, the Toast changes the text and icon, the ActivityIndicator is stopped, a bar chart was drawn and the ActionItems are enabled:

IMG_00000018

The BarChart should also work in Landscape:

IMG_00000019

…and also on the Q10:

IMG_00000077

From this BarChart you easy understand how fast reading a JSON file is directly compared with XML.

You also see that the Z30 is much faster then Q10 (Z10 similar): 81 seconds vs 117 seconds to read a XML file with 10’000 Addresses.

Perhaps you know that Cascades provides no BarChart diagram as UIControl out of the box, but it can be done using plain Containers.

To get all of this smooth working there are some Cascades – layouting – tricks, so let’s take a look at the code step-by-step.

I’m using a StackLayout, but you can also use a DockLayout – it’s up to you. For me in this case a StackLayout seems to fit better. Here’s how the Containers are layed out:

barchartLayouting

All is contained into an outer Container with Top->Bottom orientation:

  • the ActivityIndicator: only visible and consuming space if running
  • two Containers using StackLayout Left->Right for the Header Labels using spaceQuota to adjust them correct
  • one Container using StackLayout Left->Right for the Footer Labels
  • in the middle the most difficult Container: the valueContainer – also using a StackLayout Left->Right containing 4 Containers: one for each bar

The valueContainer should consume all available space, so the footer Labels will be always positioned at the bottom. The available space will change if changing the orientation or starting/stopping the ActivityIndicator.

The 4 Containers inside the valueContainer represent the bars and are filled with a background color. The height of the bars must correspond to the values we’re getting from C++ where the largest value should fill out the complete height – all other bars will get a height relative to their values. This means every time the height changes we have to recalculate the height of these Containers.

The trick to get it done is using LayoutHandlers: a LayoutHandler will be notified if the Layout changes and you can ask the handler about the height, which is the value we need in this case. We attach a LayoutHandler to the valueContainer and if the height changes, we recalculate the values.

Page {
    id: measureAddressesPage
    property int barHeight: 1200
    onBarHeightChanged: {
        calculateBarChart()
    }
    property int max: -1
    property int readJson: 0
    property int writeJson: 0
    property int readXml: 0
    property int writeXml: 0
    ......
    Container {
        id: valueContainer
        topPadding: 10
        preferredHeight: measureAddressesPage.barHeight
        layout: StackLayout {
            orientation: LayoutOrientation.LeftToRight
        }
        attachedObjects: [
            LayoutUpdateHandler {
                id: valueContainerLayoutHandler
                onLayoutFrameChanged: {
                    measureAddressesPage.barHeight = layoutFrame.height
                }
            }
        ]
	    ......
	 }
}

We store the values as properties at the Page (max, readJson, writeJson, readXml, writeXml) and there’s also a property ‘barHeight’.

The ‘barHeight’ property is bound to the preferredHeight of the valueContainer and initially set to a high value: 1200. Cascades tries to set this value as preferredHeight, but is intelligent only to use a height which fits into the available space. As we already discussed the available space can change – per ex. starting the ActivityIndicator will reduce the height and stopping will enlarge the height. In this case the LayoutHandler will get a notification and we’ll use the actual assigned height to recalculate the values.

There are some special situations where the LayoutHandler from valueContainer won’t be notified about Layout changes, but the outerContainer was notified. So as a little trick we also add a LayoutHandler to the outerContainer and if the Layout changes we simply set the preferredHeight of the valueContainer to a high value (1200) causing Cascades to grab all the available space and so on….

Another situation is if coming back from Landscape to Portrait where we also set this hight value to let Cascades do the calculating of the available space.

The TitleBar was set as sticky – this is a trick to get the correct height on Q10. Otherwise the Q10 will use a floating TitleBar, which means the height of the TitleBar will be ‘available’ and then your footer Labels will be only visible if scrolling the TitleBar away. Setting the TitleBar as sticky solves this.

Please take a deeper look at the sample code …

Business Logic (C++)

Now let’s see what happens at C++ side.

we need the ‘app’ context property to get access to the app. Also all methods must be invokable from QML. Take a look at the sources or the previous articles of this series.

We now want to concentrate an JSON and XML. You must include:

    #include <bb/data/JsonDataAccess>
    #include <bb/data/XmlDataAccess>

Now we can convert. Here’s an example HowTo read the content of a File, convert from XML to JSON and save the File:

void ApplicationUI::convertXMLtoJSONAddresses() {
	XmlDataAccess xda;
	QVariant data;
	QString filenameXML;
	filenameXML = "addresses_us.xml";
	QFile dataFile(assetsXMLPath(filenameXML));
	if (!dataFile.exists()) {
		// do something
		return;
	}
	bool ok = dataFile.open(QIODevice::ReadOnly);
	if (ok) {
		data = xda.loadFromBuffer(dataFile.readAll());
		dataFile.close();
	} else {
		// do something
	}
	QString filenameJSON;
	filenameJSON = "addresses_us.json";
	JsonDataAccess jda;
	jda.save(data, dataPath(filenameJSON));
	emit conversionDone();
}

Removing the File-Open-Read-Write code converting is as simple as:

XmlDataAccess xda;
QVariant data;
...
data = xda.loadFromBuffer(dataFile.readAll());
...
JsonDataAccess jda;
jda.save(data, dataPath(filenameJSON));

You can load from Files or from a ByteArray you’re getting from a Network request. JsonDataAccess or XmlDataAccess will give you a QVariant. This QVariant can be a QVariantMap if the content is a single Object or a QVariantList if it’s an Array.

In the sample app you’ll find samples HowTo convert from XML to JSON or from JSON to XML, you’ll see how Signals are emitted and HowTo convert the Speakers to a much smaller JSON file with really fast READ access. Here’s the MeasureSpeakerPage:

IMG_00000020

Don’t forget

Please don’t forget to add the libraries to your .pro file

LIBS +=  -lbbsystem -lbbdata

Summary

from this sample you have learned

  • HowTo create a Custom BarChart diagram
  • Enable / Disable ActionItems
  • Use of SystemToast in QML
  • Use of ActivityIndicator
  • Use of LayoutHandler to provide flexible Layouts for all Devices
  • Connect QML functions to C++ Signals
  • HowTo read and write JSON and XML files
  • HowTo convert JSON to XML or XML to JSON

The main goal of this article was to demonstrate the speed of JSON and the easy way to deal with JSON.

The next part of this series will explain

  • How I’m using JSON to persist the data in a conference app
  • HowTo attach JSON data to ListView DataModels
  • HowTo search and filter JSON data.

We’ll use the same data as used in this sample.

Download and Discuss

The Sample APP is available at GitHub Open Source (Apache 2 License): https://github.com/ekke/cascades_json_vs_xml

I also created a Thread in the Forums, where you can ask or discuss this.

Have fun with the sample app and copy/paste what you need to implement Custom BarCharts into your own apps or to use JSON for your data files.

This is part #2 of my series ‘Conference App Secrets’.

In part#1 I demonstrated HowTo dispay a EULA at first start of the application.

This time I will talk about a Custom Credentials Dialog. There’s already a SystemCredentialsPrompt for Cascades, but we ran into an issue with the password. There were situations where the password field was not masked.

BBJam Asia Login

q10_bbjam_home

So I developed a Custom Credentials Dialog to do the Login into BBJam Asia Conference App.

There are different use-cases to do a Login – for the BBJam Asia Conference App Login is optional.

Everyone can use the App and take a look at Sessions, Speakers, Venue, …

To get access to personal schedule, bookmark Sessions as Favorites or fill out Surveys you must be logged in.

Login needs a Username and Password and there should be an easy way to request a new Password directly from Login Dialog.

Login credentials are sent to a Server and feedback if Login was successfull or not comes back asynchron.

If you need a successful Login to start your App you can implement your Login logic similar to the EULA license dialog.

I have extracted the code to do a Custom Login into a sample App and – as usual – all is available at Github (Apache 2 License).

You should download the BBJam Asia Conference App to see it there in action.

UI (QML)

We need a Dialog with a Title, two entry fields and some Buttons. To solve this the easiest way, we create a Custom Dialog with some properties: alias properties to get the values from fields and a result string.

Dialog {
    id: loginDialog
    property string result
    property alias usernameEntry: usernameField.text
    property alias passwordEntry: passwordField.text

The Dialog gets a Container with a solid background color, so nothing will shine through. The color depends from Theme:

Container {
        id: dialogContainer
        background: isDark() ? Color.Black : Color.White
        horizontalAlignment: HorizontalAlignment.Fill
        verticalAlignment: VerticalAlignment.Fill

To detect the Theme we use a function:

function isDark() {
        return Application.themeSupport.theme.colorTheme.style == VisualStyle.Dark
    }

Inside the Dialog Container we have a Container for the Title and some Container for the content to display the entry fields and Buttons.

The Title Container in the sample app has a blue background – the conference app uses the special JAM color. We use a fixed height for the Title and a white Label.

Here’s the Title Container:

Container {
            id: titleContainer
            background: Color.Blue
            topPadding: 5
            horizontalAlignment: HorizontalAlignment.Fill
            verticalAlignment: VerticalAlignment.Fill
            minHeight: 90
            maxHeight: 90
            Label {
                text: "Login to your App"
                textStyle.base: SystemDefaults.TextStyles.TitleText
                textStyle.color: Color.White
                horizontalAlignment: HorizontalAlignment.Center
                verticalAlignment: VerticalAlignment.Center
                translationY: 14
            }
        }

In your application all text values like “Login to …” should be translated values qsTr(“Login to …”)

The Content is placed inside a ScrollView, so it also works and all is accessible if you’re using a Touch Device in Landscape mode with only 768 (Z10) or 720 (Z30) height and virtual keyboard. The Content Container (id: body) has some padding values – you can adjust them if you want to redesign the layout.

Inside the Container there are the two entry fields for Username (id: usernamefield) and Password (id: passwordField).

Remember that we have access to the values from the Dialog alias properties.

               TextField {
                    id: usernameField
                    hintText: qsTr("Email Address or Username")
                    text: ""
                    onTextChanging: {
                        loginButton.enabled = passwordField.text.length > 0 && text.length > 0
                        forgotButton.enabled = text.length > 0
                    }
                    inputMode: TextFieldInputMode.Url
                }
                TextField {
                    id: passwordField
                    hintText: "My Password"
                    topMargin: 30
                    text: ""
                    onTextChanging: {
                        loginButton.enabled = usernameField.text.length > 0 && text.length > 0
                    }
                    onTextChanged: {
                        loginButton.requestFocus()
                    }
                    inputMode: TextFieldInputMode.Password
                }

There’s some UI-logic implemented:

  • Login Button is only enabled if there are values entered for Username and Password
  • Forgot Password Button is only enabled if there’s a value entered for Username

So we’re watching the slot onTextChanging{}: if text is eneterd we enable / disable the buttons.

Both textFields have a different inputMode: Url for Username and Password for PasswordField.

Also the second field (PasswordField) watches onTextChanged{}. This event happened if user has entered all characters and typically hit the RETURN key.

The Buttons are sending different results back – here’s the Login Button:

Button {
         id: loginButton
         enabled: false
         text: qsTr("Login")
         preferredWidth: Infinity
         focusPolicy: FocusPolicy.KeyAndTouch
         onClicked: {
           loginDialog.result = "LOGIN"
           loginDialog.close()
          }
}

per default the button is disabled. if clicked the result is set to LOGIN and the Dialog will close.

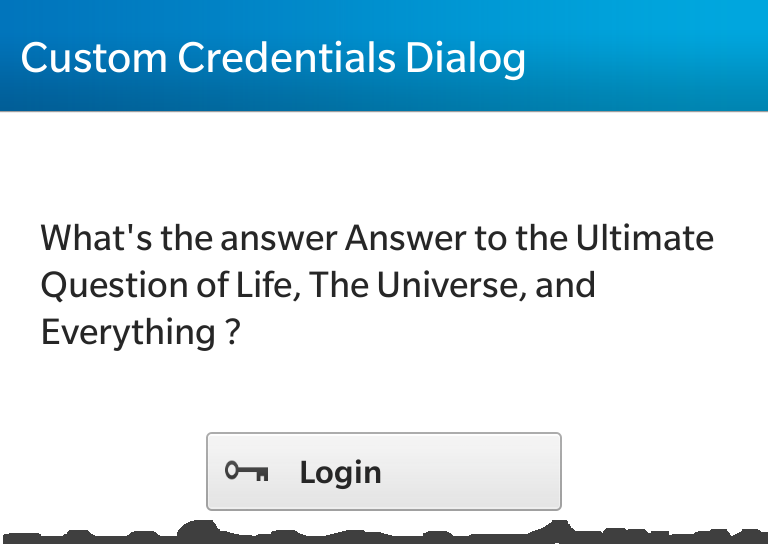
Here’s the LoginDialog from dark Theme on Q10 and light Theme on Z10 using different backgrounds:

q10_custom_login

z10_custom_login

The logic to show the Dialog is inside the

assets/main.qml

which is a TabbedPane in ConferenceApp and a simple Page in the sample App.

At first we have to add the Custom Dialog as an attachedObject. Here you also see what happens, if the Dialog was closed. We test for the result and call a method from C++: app.login(…) or app.forgotPassword(…) using the entered values as parameters.

    attachedObjects: [
        LoginDialog {
            id: myLoginDialog
            onClosed: {
                if (myLoginDialog.result == "LOGIN") {
                    console.log("LOGIN");
                    app.login(myLoginDialog.usernameEntry, myLoginDialog.passwordEntry);
                    myLoginDialog.usernameEntry = ""
                    myLoginDialog.passwordEntry = ""
                    return
                }
                if (myLoginDialog.result == "FORGOT") {
                    console.log("FORGOT PASSWORD");
                    app.forgotPassword(myLoginDialog.usernameEntry)
                    myLoginDialog.passwordEntry = ""
                    return
                }
                console.log("CANCEL LOGIN");
                myLoginDialog.usernameEntry = ""
                myLoginDialog.passwordEntry = ""
            }
        },
        SystemToast {
            id: mailSentToast
            body: "Mail send to request a new Password."
        }
    ]

There’s also a SystemToast to send a notification to the user that a new password was requested.

To open the Dialog we’re using a Button:

        Button {
            id: loginButton
            visible: ! rootPage.loginDone
            text: qsTr("  Login") + Retranslate.onLanguageChanged
            imageSource: "asset:///images/buttons/login.png"
            horizontalAlignment: HorizontalAlignment.Center
            verticalAlignment: VerticalAlignment.Center
            onClicked: {
                myLoginDialog.open();
            }
        }

If the Button was clicked, we open the LoginDialog.

Our Application should work on devices with light theme (Q5, Z10) and dark theme (Q10, Z30), so we need the login.png for both.

Cascades uses static asset selectors for this:

static_assets

As you can see there are two login.png. And here’s how it looks from Q10 and Z10:

q10_custom_main

z10_custom_main

To receive the signals from C++ we have to connect to them:

    function onLoginDone(success) {
        if (success) {
            rootPage.loginDone = true
            return
        }
        // send toast to user that login failed
    }
    function onMailSent(){
        mailSentToast.show()
    }
    onCreationCompleted: {
        // we have to wait for the signal that login was done
        app.loginDone.connect(onLoginDone)
        app.mailSent.connect(onMailSent);
    }

The scret to connect is done inside the onCreationCompleted{}: we connect the signals loginDone() and maiSent() from the C++ Application (app) and call a corresponding function. if login was done with success we set a property, whcih makes another label visible. if a new password was requested we show the SystemToast.

Business Logic (C++)

Now let’s see what happens at C++ side.

we need the ‘app’ context property:

    // access to the Application
    qml->setContextProperty("app", this);

Setting the context property isn’t enough – we must tell Qt that some of our methods can be invoked. This is done in the applicationUi.hpp Headerfile:

	Q_INVOKABLE
	void forgotPassword(const QString& email);

	Q_INVOKABLE
	void login(const QString& user, const QString& pw);

We’re also sending some signals:

signals:
	void loginDone(const bool& success);
	void mailSent();

Remember: we connected to these signals from main.qml.

Here’s the implementation of the Q_INVOKABLE methods:

void ApplicationUI::forgotPassword(const QString& email) {
	qDebug() << "CASCADES CREDENTIALS | ApplicationUI::forgotPassword | email address: " << email;
	// send the information to the server
	// or send an email to admin
	// let user know that password was requested
	emit mailSent();
}

void ApplicationUI::login(const QString& user, const QString& pw) {
	qDebug() << "CASCADES CREDENTIALS | ApplicationUI::login for user: " << user;
	// test if login OK or call server
	// in this app all logins are OK
	emit loginDone(true);
}

signals must NOT be implemented: using emit loginDone(true) sends them out to all connected to this signal, which can be from C++ and/or QML.

emitting this signals gets the function onLoginDone() called in main.qml.

This is only a sample app: it’s up to you to verify if username and password are valid. Can be done checking a local database or calling a server. If you want to store the username and password you should use QSettings. I explained the use of QSettings in part#1 of this series.

Don’t forget

Please don’t forget to import the bb.system libraries in QML to make the SystemToast run.

import bb.system 1.0

Summary

from this sample you have learned

  • HowTo reate a Custom Credentials Dialog
  • Enable / Disable Buttons depending from text Input
  • Use of SystemToast in QML
  • Use static asset selectors for Images to support dark and light themes
  • Connect QML functions to C++ Signals

Download and Discuss

The Sample APP is available at GitHub Open Source (Apache 2 License): https://github.com/ekke/cascades_credentials_prompt

I also created a Thread in the Forums, where you can ask or discuss this.

Have fun with the sample app and copy/paste what you need to implement Custom Login Dialogs into your own apps.

Writing mobile applications in most cases you want to provide a EULA (End-User-License-Agreement) and the user has to agree to your conditions before using the App. Doesn’t matter if the app is free or not.

BlackBerry Jam Asia 2013 Conference APP

This year first time ever I developed the official BlackBerry Conference App for BlackBerry Jam Asia 2013 in Hong Kong. See this BlackBerry Developer Blog Post.

IMG_00000005

BlackBerry Jam Asia 2013 is a native BlackBerry 10 APP: Cascades / QML / C++ and can be downloaded from BlackBerry World for free.

It’s recommended to download the Conference App, so you can see how it all works in the context of a complex app.

The EULA is the first Dialog visible after downloading and opening the App, but it was the last part I developed 😉

I allready had implemented an english version hard-coded, but for licenses it’s important that the user understands the content, so the license must be available in all languages.

Last – Minute hacking MUC -> DUBAI -> Hong Kong

I got this information just as I was boarding my flight from Munich to Hong Kong via Dubai. Fortunately the A380 from Emirates has WiFi on board.
So I could communicate and hacking the code.

In Dubai I had to wait some hours for my connection flight, so I did some last coding …

IMG_00000513

…and finally uploaded the App.

Thanks to BlackBerry I’m allowed to blog about the conference app, patterns used and tips or tricks. This article is the first one of a series.

Usecase

I want to give you some hints HowTo show a localized EULA at startup.

Extracting code from the Conference App into a easy-to-use sample will make it easy for you to use it.

eula1

Let’s take a look at the UI first

UI (QML)

We need a Dialog with a Title, the License Text and two Buttons: Agree / Don’t Agree. To solve this the easiest way, we create a Custom Dialog with some properties: alias properties to fill the fields and a result string.


Dialog {
  id: eulaDialog
  property string result
  property alias title: titleLabel.text
  property alias body: bodyLabel.text
  property alias button1: acceptButton.text
  property alias button2: cancelButton.text

The Dialog gets a Container with a solid background color, so nothing will shine through. The color depends from Theme:


Container {
  background: isDark() ? Color.Black : Color.White
  horizontalAlignment: HorizontalAlignment.Fill
  verticalAlignment: VerticalAlignment.Fill

To detect the Theme we use a function:


function isDark() {
  return Application.themeSupport.theme.colorTheme.style == VisualStyle.Dark
}

Inside the Dialog Container we have a Container for the Title and another Container for the content.

The Title Container in the sample app has a blue background – the conference app uses the special JAM color.

The Content is placed inside a ScrollView, so it doesn’t matter how long your license text is or if it’s running on a 720×720 Q10 or 720×1280 Z30.

At the bottom below the content the Accept and Cancel Buttons are placed. Hitting one of them sets the result string and closes the Dialog. Here’s the Accept Button:


Button {
  id: acceptButton
  text: qsTr("I Agree")
  layoutProperties: StackLayoutProperties {
    spaceQuota: 1
  }
  focusPolicy: FocusPolicy.KeyAndTouch
  onClicked: {
    eulaDialog.result = "ACCEPTED"
    eulaDialog.close()
  }
}

Complete sourcecode of this Custom Dialog is in

assets/EULADialog.qml

The logic to show the Dialog or not is inside the

assets/main.qml

which is a TabbedPane in ConferenceApp and a simple Page in the sample App.

At first we have to add the Custom Dialog as an attachedObject:


attachedObjects: [
  EULADialog {
    id: eulaDialog
    property bool firstRun: true
    onClosed: {
      if (eulaDialog.result == "ACCEPTED") {
        app.setEulaAccepted()
        // do your normal startup stuff now
        return
      }
    if (firstRun) {
      noEulaDialog.exec()
      return
    }
    Application.requestExit();
  }
},
SystemDialog {
  id: noEulaDialog
  title: "EULA License"
  body: qsTr("You must accept the EULA in order to use the App.") + Retranslate.onLanguageChanged
  confirmButton.label: qsTr("OK") + Retranslate.onLanguageChanged
  confirmButton.enabled: true
  cancelButton.enabled: false
  onFinished: {
    eulaDialog.firstRun = false
    eula()
  }
},
..... more
]

As you can see there’s a second Dialog, a SystemDialog – this Dialog is used if the user doesn’t accept the license. There’s only one chance to retry – if second time the license was not accepted, the App is closed:

Application.requestExit();

If the EULA is ACCEPTED we call a method from C++:

app.setEulaAccepted()

If the EULA is accepted, a value was inserted into Settings, so next time no EULA was displayed.

Now let’s take a look HowTo open the EULA Dialog. At the bottom of main.qml as part of the onCreationCompleted slot:


onCreationCompleted: {
  if (app.showEula()) {
    eulaTimer.start()
  } else {
    // do your normal startup stuff now
    doItAgin.visible = true
  }
}

We ask the C++ application if the EULA dialog must be opened:

app.showEula()

If the EULA must be opened a little trick:

While testing the Conference App on different devices with different OS we found out that an older 10.1 OS Version has some problems opening the Dialog direct from the onCreationCompleted{}. So we’re doing this async and start a single-shot QTimer, which then opens the dialog.

This QTimer was also attached as an object:


attachedObjects: [
  .......
  QTimer {
    id: eulaTimer
    interval: 500
    singleShot: true
    onTimeout: {
      eula()
    }
  }
]

onTimeout calls a function:


function eula() {
  var data = app.eulaContent()
  eulaDialog.title = data.title
  eulaDialog.body = data.body
  eulaDialog.button1 = data.button1
  eulaDialog.button2 = data.button2
  // now it's safe to open the Dialog
  eulaDialog.open()
}

We get the localized content from C++

app.eulaContent()

The content is a QVariantMap, so can directly be used as a Javascript Object and we set the values of alias properties.

Finally starting the App the first time we get immediately the Custom Dialog:

IMG_00000001

Above you see a localized Dialog with german Title and german Button texts. Starting the Conference App you’ll get a real EULA License text.

If the user doesn’t agree, this SystemDialog appears exactly one time and opens the EULA DIalog again:

IMG_00000002

Business Logic (C++)

Now let’s see what happens at C++ side.

Inside the constructor of applicationUi.cpp the QTimer must be registered as type, so QML knows it:


qmlRegisterType<QTimer>("my.library", 1, 0, "QTimer");

also we need the ‘app’ context property:


qml->setContextProperty("app", this);

Setting the context property isn’t enough – we must tell Qt that some of our methods can be invoked. This is done in the applicationUi.hpp Headerfile:


Q_INVOKABLE
bool showEula();

Q_INVOKABLE
QVariant eulaContent();

Q_INVOKABLE
void setEulaAccepted();

Back to the .cpp file and take a deeper look at these methods.


bool ApplicationUI::showEula() {
  QSettings settings;
  if (settings.value(SETTINGS_KEY_EULA_ACCEPTED).isNull()) {
    return true;
  }
  return false;
}

showEula() uses QSettings to see if the EULA was already opened. QSettings is a simple way to persists values in a local secure filestore.

You’ll find the settings file from TargetFileSystemNavigator – View in your Momentics IDE inside the sandbox of your app:

settingsfile

this is the path to the settings file:

data/Settings/<your-vendor-name>/<your-app-name>.conf

Opening the settings file you’ll find this entry if the EULA is accepted:

[General]
eula_read=true

here’s HowTo set the value:


void ApplicationUI::setEulaAccepted() {
  QSettings settings;
  bool accepted = true;
  settings.setValue(SETTINGS_KEY_EULA_ACCEPTED, QVariant(accepted));
}

Hint: If you want to test again if the EULA Dialog will be displayed, delete the Settings File from TargetFileSystemNavigator.

Now the last missing piece is getting the localized EULA.

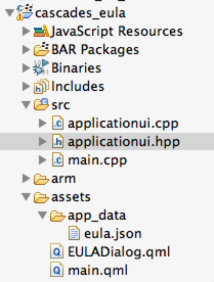
Here’s the project structure from sample app:

eula sample project

All EULA texts are contained inside a JSON file:

assets/app_data/eula.json

The structure of this JSON is easy to understand:


[
  {
   "locale":"pl",
   "title":"AKCEPTACJA LICENCJI:",
   "body":"………… Lorem",
   "button1":"Zgadzam się",
   "button2":"Nie zgadzam się"
  }
,...
]

A JSON Array containing JSON Objects, where each JSON Object has as index the “locale” property (‘en’, ‘de’, ‘pl’,…) and properties for “title”, “body”, “button1” and “button2”

Working with JSON in Cascades Apps is really easy. Here’s the code HowTo read this JSON Array from assets/app_data into a QVariantList:


QVariantList ApplicationUI::readEulaFromJson() {
  JsonDataAccess jda;
  QVariantList eulaList;
  QString eulaFilePath;
  eulaFilePath = QDir::currentPath() + "/app/native/assets/app_data/eula.json";
  if (!eulaFile.exists()) {
    qDebug() << "no eulaFile file found in assets - using english";
    return eulaList;
  }
  bool ok = eulaFile.open(QIODevice::ReadOnly);
  if (ok) {
    eulaList = jda.loadFromBuffer(eulaFile.readAll()).toList();
    eulaFile.close();
  } else {
    qDebug() << "cannot read eulaFile file: " << eulaFilePath;
  }
  return eulaList;
}

As soon as you got the list, you can search for the current locale. If an entry is found give this back.

If no entry found check for the first 2 characters only: the language. Per ex. ‘de_DE’ and ‘de_AT’ are valid locales for german language in Germany (DE) or Austria (AT), so if ‘de_DE’ not found, we look for ‘de’. If again no entry found, we use ‘en’ – english as default.

See the details in applicationUi.cpp:


QVariant ApplicationUI::eulaContent() {
...
}
QVariantMap ApplicationUI::euladoc(const QString& locale) {
...
}

Don’t forget

Please don’t forget to import the libraries in QML


import bb.system 1.0
import my.library 1.0

Also don’t forget to add the libraries into your .pro file_

LIBS += -lbbsystem -lbb -lbbdata

Summary

from this sample you have learned

  • HowTo use QSettings to persist values
  • HowTo access JSON data files
  • Communicate between C++ and QML
  • Use of QTimer in QML
  • Writing a Custom Dialog in QML
  • Using a SystemDialog in QML

Download and Discuss

The Sample APP is available at GitHub Open Source (Apache 2 License): https://github.com/ekke/cascades_eula

I also created a Thread in the Forums, where you can ask or discuss this.

Have fun with the sample app and copy/paste what you need to implement EULA Dialog into your own apps.