even the smallest utility app should follow the BlackBerry 10 Design Guides
… to provide the cool UX of this platform.
as you probably know, I just switched my main device from i to z and I’m searching to find all the apps I need for my Z10 to be satisfied.
one of these (for me important and) useful apps is a Tea Timer and I looked around at BlackBerry World, but didn’t found a TeaTimer providing BlackBerry 10 UX.
so I decided to develop my own 😉
here’s a short video to get first impressions:
edited: 2013-03-07 (begin)
I got really valuable feedback from Staffan Lincoln (Designer at TAT/Cascades) and changed the minimized views (ActiveFrame / SceneCover) and also replaced the animated Slider by an own custom animation – of course all using Cascades. (see below some more infos)
here’s the new Video demonstrating minimized Views and new animations:
http://vimeo.com/ekkescorner/teatimer-anmimations
edited: 2013-03-07(end)
You like it ?
ekkes TeaTimer for Z10 + DevAlpha at BlackBerry World
ekkes TeaTimer is available at BlackBerry World:

I started this app small (only counting a timer) but after some days of work I realized that even in this small app I’m using all concepts and frameworks of BlackBerry10 Cascades Apps.
So I got the idea to use this app as a case study to demonstrate to other users and developers what’s important to develop a BlackBerry 10 Quality App and to provide the unique BlackBerry 10 UX.
While thinking about this the next idea was born: I will use the TeaTimer as a template to develop another app, which can be used in my Cascades Trainings and also an upcoming BlackBerry Cascades book. The TeaTimer is a .99 $ app, but be prepared that next months there will be an OSS (Apache 2 licensed) sister project (egg-cooking-timer) helping you to understand how it works and to follow my trainings and the book.
The documentation of Cascades is really good and you’ll find many sample apps and cascades-projects and cascades-community-projects at Github. But you know: if you’re working on real-world-apps then all the samples are only samples and you always miss some more infos or the glue code between different parts / samples. The goal of my trainings is to fill this gap and to help you to create cool and outstanding apps with Cascades.
OK – let’s take a look …
… behind the scenes of ekkes TeaTimer:

UI Design Guide
most important if developing BlackBerry 10 applications: follow the design guidelines. perhaps it’s some more work for you but your apps will be seamless integrated into the BlackBerry 10 UX.
for me it doesn’t matter if developing a small utility like this one or a complex business application for customers: they all are following the UI Design guidelines.
following the guidelines is also a first step to get your APP as certified ‘Built for BlackBerry‘. I got this certification for my OpenDataSpace App.
Now let’s go through some parts of the TeaTimer APP and see what I did there to follow the BlackBerry 10 UI Design Guides and to develop a TeaTimer different to others.
BTW: all my previous apps are using the light theme – TeaTimer will use a dark theme.
Portrait / Landscape
In all my applications I’m always trying to have all (or most) screens available in Landscape and Portrait because from my POV an APP should not dictate the users HowTo hold the device 😉
Sometimes it’s easy and you have to do nothing – sometimes it’s more difficult or even impossible. here are some samples from ekkes TeaTimer:


I decided to use an image of 720×720 which will fit perfect for Z10 from width in portrait, height in landscape and also Q10. In Portrait the DropDown is placed below the image and in Landscape besides. I’m using a DockLayout and put all the fields without the images into a Container.
Container {
    id: descriptionContainer
    layout: DockLayout {
    }
    verticalAlignment: VerticalAlignment.Fill
    horizontalAlignment: HorizontalAlignment.Fill
    translationY: 720
    translationX: 20
    // which tea ?
    DropDown {
        id: brewSelected
        objectName: "brewSelected"
        title: qsTr("selected Tea:") + Retranslate.onLanguageChanged
        visible: true
        verticalAlignment: VerticalAlignment.Top
        horizontalAlignment: HorizontalAlignment.Center
        translationX: -20
        translationY: 0
        preferredWidth: 720
        onSelectedValueChanged: {
            teaPage.teatime = selectedValue
        }
        onExpandedChanged: {
            if (expanded) {
                teaPage.actionBarVisibility = ChromeVisibility.Hidden
                stoppedLabel.visible = false
            } else {
                teaPage.actionBarVisibility = ChromeVisibility.Visible
                stoppedLabel.visible = true
            }
        }
    }
	// some more fields .....
} // end descriptionContainer
Now it’s easy to move the Container around, to re-align the DropDown and even have some more space for DropDown-Title in Portrait:
function reLayout(orientation) {
    if (orientation == UIOrientation.Landscape) {
        descriptionContainer.translationY = 0
        descriptionContainer.translationX = 720
        brewSelected.horizontalAlignment = HorizontalAlignment.Left
        brewSelected.translationX = 0
        brewSelected.title = qsTr("selected:") + Retranslate.onLanguageChanged
        brewSelected.preferredWidth = 720 - 160
		// more stuff
    } else {
        descriptionContainer.translationY = 720
        descriptionContainer.translationX = 20
        brewSelected.horizontalAlignment = HorizontalAlignment.Center
        brewSelected.translationX = -20
        brewSelected.title = qsTr("selected Tea:") + Retranslate.onLanguageChanged
        brewSelected.preferredWidth = 720
		// more stuff
    }
}
Hint: in Portrait I noticed if the DropDown was placed on the bottom of the Page even inside a ScrollView the expanded DropDown was partially invisible under the ActionBar, so I hide the ActionBar if DropDown is exanded. positive side-effecrt: the user only sees the important thing: the options of available Teas.
Another hint: if you’re using long-running animations as I’m doing with the images (see below) be aware: if orientation changes the animation is stopped, so you have to freeze the orientation while animation is running or to save and restore the values.
To be a good citizen in Portrait and Landscape isn’t always an easy job for your app – I will go into the details at my trainings.
ApplicationMenu
Swipe down from the top bezel and there should be your ApplicationMenu. Place Help, Settings or seldom used functionality there.
ekkes teaTimer added to the ApplicationMenu:
- Help
- About
- List of Teas
- Settings

Don’t forget: if you open a Menu from ApplicationMenu you have to disable this Menu or the complete ApplicationMenu until the User goes back !
Implementing these Menus I used some different technologies:
- Help gives the user access to a Video (using InvocationFramework – MediaPlayer)
- About opens a website (using Cascades WebView)
- List of Teas is a ListView with a JSON datasource bound to a GroupDataModel
- Settings are stored using QSettings. AccountService was used to select default Notebook. InvocationFramework was used
- forFourSquare OAuth
- to give easy Access to Notifications – Settings
MediaPlayer (through InvocationFramework)
Invoking the MediaPlayer is easy done. (You already found examples on this in my Open Source Github project at BlackBerry ‘OpenDataSpace‘.
void ApplicationUI::invokeBoundMediaPlayer(const QString& uri) {
	mUsecase = Usecase::MediaPlayer;
	InvokeRequest cardRequest;
	if (uri.startsWith('/')) {
		cardRequest.setUri("file://" + uri);
	} else {
		cardRequest.setUri(uri);
	}
	cardRequest.setTarget("sys.mediaplayer.previewer");
	mInvokeManager->invoke(cardRequest);
}
Using the InvocationFramework the user doesn’t know that you’re calling another APP – it’s integrated into the TeaTimer and you can “peek back” or Go Back by a tap:

I created this Video to explain the APP to the user. Of course before starting the MediaPlayer rthe user gets the info that the Video will be played from Internet, so he/she can cancel to avoid traffic.
WebView (About…)
To include a site from the web you simply use a WebView. Put this WebView inside a ScrollView where scrolling in both directions is enabled, also enable PinchToZoom. There are some signals like onLoadProgressChanged(), where you easy can ad an ActivityIndicator to show the progress while the Page was loading.
The WebPage is seamless integrated into the app now – no use of a Browser:

List of Teas (JSON, GroupDataModel, ListView)
Some more infos HowTo provide data see below. Here’s how the ListView is looking:

In most cases I’m not using standard ListItems, because it’s easy to create custom ListItems. In this case we have an Image, Description and BrewingTime. One Tea can be marked as your favorite Tea – in this sample ‘Assam’ wher you see the Image with the CheckMark. You can now Add, Delete or Edit entries. If you tap on one Item you get this Page with the details:

There’s a TextField for the description, a switch (ToggleButton) to select you favorite Tea and a DateTime Picker to set the brewing time. If you change the value of the Switch, the Images right beside the Switch will also be changed automatically.
Let’s take a look at the DateTimePicker, because handling of dates isn’t always easy.
DateTimePicker {
    id: timePicker
    preferredWidth: 720
    topMargin: 24
    title: qsTr("Duration")
    mode: DateTimePickerMode.Timer
    minimum: timePicker.dateFromTime("00:00:30")
    maximum: timePicker.dateFromTime("00:30:00")
    onValueChanged: {
        duration = Qt.formatDateTime(value, "mm:ss");
        // .....
    }
}

Some important things to note:
- DateTimePickerMode.Timer must be used to get the hh – mm – ss values
- minimum / maximus are set to avoid that the user does enter wrong values, also we cannot suppress the hours, but we have to be sure that no hours are entered. using min/max is an easy way to solve this.
- onValueChanged() gives us the time as value and we can use the built-in Qt.formatDateTime functions to format the value
Last thing to know: HowTo set the Value from your bound DataModel ? we have stored the brewing time as ‘mm:ss’ – the Picker needs ‘hh:mm:ss’ and we can set the value this way:
timePicker.value = timePicker.dateFromTime("00:"+data.duration)
In this case we used the dateFromTime() you can use for a Timer Picker.
Settings (QSettings)
The easiest way to store your settings is using QSettings. All values will be stored in the data directory of your app sandbox:
sandboxes/<your-app>/data/settings/<your-vendor-name>/<your-app-name>.conf
here’s the C++ code to get stored values:
QString TeaSettings::getValueFor(const QString &objectName,
		const QString &defaultValue) {
	QSettings settings;
	// If no value has been saved, return the default value.
	if (settings.value(objectName).isNull()) {
		return defaultValue;
	}
	// Otherwise, return the value stored in the settings object.
	return settings.value(objectName).toString();
}
and here’s a screenshot of the TeaTimers Settings:
Settings (Remember – Notebook – Evernote)
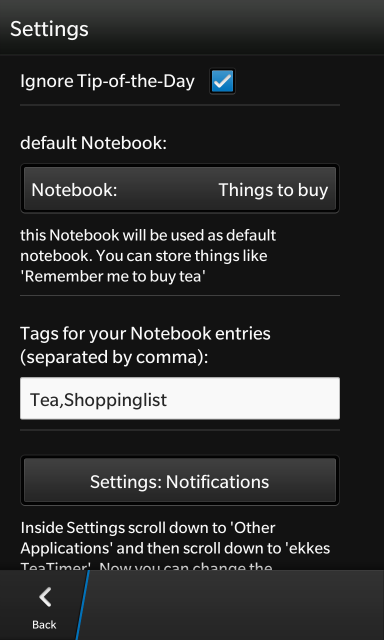
I integrated to BlackBerry 10 Notebooks. Notebooks are part of the Remember APP and can be local Notebooks or Evernote Notebooks. Notebooks are an easy way to remember things and while preparing the Tea to be brewed perhaps you notice that you have to buy some new Tea. ekkes teaTimer makes it easy to create an entry for a Notebook. If you’re using the Remember APP with Notebooks heavy (as I’m doing) it would be nice to pre-select the Notebook where you want to store the entries and perhaps also some Tags. Tags are stored in QSettings – also the default Notebook.
To have access to a Notebook you need tqo keys: <Account-Key> and <Notebook-Key>.
There are some Services we have to use:
bb::pim::account::AccountService
bb::pim::notebook::NotebookService
Now we can ask the NotebookService for a list of all know Notebooks.
QList<Notebook> nl = mNotebookService.notebooks();
Here’s the List of Notebooks:

From this list you have access to all informations you need, like:
Notebook n = (Notebook) nl.at(i);
providerDisplayName = as.account(n.id().accountKey()).displayName();
Store the AccountKey and NoteBookKey in your settings and you have all we need later to invoke this Notebook (see below)
Settings (Foursquare SSO – InvocationFramework)
Next Settings are for Foursquare. What the hell am I doing with Foursquare inside a TeaTimer you may ask ?
If I’m on-the-go and want to know where’s the next place to buy Tea or to drink a cup of Tea, Foursquare is my friend, always knowing some cool places nearby. So why not integrating Foursquare to get the places with one tap ? Thanks to Kyle Fowler (@kfow35) it’s really easy to integrate Foursquare.
There’s a Github project and using SSO (SingleSignOn) you only need to make your connection between your app and Foursquare once. Then you get an OAuth token, store this token inside your (secured in sandbox) settings – data and use it invoking the Foursqueare App. (see below)
Invoking Foursquare SSO from C++:
void ApplicationUI::onFoursquareSSO() {
	mUsecase = Usecase::FoursquareSSO;
	InvokeRequest cardRequest;
	cardRequest.setTarget("com.foursquare.blackberry.sso.card");
	cardRequest.setAction("bb.action.VIEW");
	cardRequest.setMimeType("sso/foursquare");
	cardRequest.setData(mFoursquareClientId.toUtf8());
	mInvokeManager->invoke(cardRequest);
}

Then from CardDone Message you can extract the Token to be stored:
QString myToken = doneMessage.data().split("\"").at(1);
if (!myToken.isEmpty()) {
	mTeaSettings->saveValueFor(SETTINGS_KEY_FOURSQUARE_TOKEN, myToken);
}
To connect your App with Foursquare at first you have to go to Foursquare Developer Site and register your APP there.
Then you’re gitting two codes:
store these codes – there are some calls where you need them as above invoking onSSO().
Hint: while registering your app at Foursquare you’ll be asked for a redirect URL, for BlackBerry10 you have to enter:
http://localhost
Settings (Notifications)
As soon as the Tea is ready we have to notify the User. As a good citizen it should be easy to set the application-specific Notifications.
We’re using the InvocationFramework to do this. In QML we have a Button on the SettingsPage:
Button {
    id: settingsButton
    topMargin: 48
    preferredWidth: 720
    text: qsTr("Settings: Notifications") +Retranslate.onLanguageChanged
    onClicked: {
        app.invokeSettings("settings://notification")
    }
}
Clicking this Button will call this C++ code:
void ApplicationUI::invokeSettings(const QString& uri) {
	mUsecase = Usecase::Settings;
	InvokeRequest request;
	request.setAction("bb.action.OPEN");
	request.setTarget("sys.settings.target");
	request.setMimeType("settings/view");
	request.setUri(uri);
	mInvokeManager->invoke(request);
}
Animations
Most timers are only using a countdown. If you prefer such kind of a timer, it’s already built into the BlackBerry10 OS Clock:

I wanted to use some other kinds of animations. You probably know the Cascades Sample Lightning Crossfades where you have a slider and using this slider you can manually fade from one image to a second image.
My solution:
I shot 8 images from my Teapot showing the steps to brew tea:
empty Teapot → Tea strainer used → filling in hot water → brewing → pulling out Tea strainer → Tea ready:

So I have 7 transitions between images. All images are placed ‘on top’ which is easy done in a DockLayout:
ImageView {
    id: image1
    imageSource: "asset:///images/tea-timer-01a.png"
    verticalAlignment: VerticalAlignment.Top
    horizontalAlignment: HorizontalAlignment.Center
    preferredWidth: 720
    preferredHeight: 720
    opacity: 1.0
}
the first image with the empty Teapot has opacity of 1.0 and all the others 0.0, so they’re invisible.
I’m using a SequentialAnimation where each transition has a duration of 1/7 of brewing time.
SequentialAnimation {
    id: brewingAnimation
    repeatCount: 1
    animations: [
        FadeTransition {
            target: image2
            fromOpacity: 0.0
            toOpacity: 1.0
            duration: teaPage.teatime / 7
        },
        FadeTransition {
            target: image3
            fromOpacity: 0.0
            toOpacity: 1.0
            duration: teaPage.teatime / 7
        },
        // and so on
    ]
    onEnded: {
        // Attention: don't use onEnded !
        // won't be triggered if app minimized !
    }
}
Now it becomes difficult: normaly if an animation reaches the end, there’s an onEnded() signal where you can do your stuff. We cannot use this signal, because we want to run our App in the background and if brewing time is finished, we have to notify the user. So: don’t use onEnded() in this case !
As always with Cascades and Qt there’s a solution – in this case attach a QTimer:
QTimer {
    id: timer
    interval: teaPage.teatime
    onTimeout: {
        teaPage.teaReady()
    }
}
Start this Timer together with your animation. QTimer also runs if your app is in the background – so you’ll get the Signal that brewing time is finished.
Fading through the Images is nice, but the User should have an information about the progress. For this I’m using a Slider.
Next question was: HowTo move the Slider on ? There’s no Animation on Sliders. As you can see from the SequentialAnimation above the fading was done changing the Opacity – and that’s the key: there’s a signal from opacity-changes, so you can calculate the value of the slider:
ImageView {
    id: image2
    // more properties
    opacity: 0.0
    onOpacityChanging: {
        brewSlider.value = 12.5 + (12.5 * opacity)
    }
    onOpacityChanged: {
        brewSlider.value = 25.0
    }
}
Now we got it: Images are fading from Image 1 … 8 while the Slider is moving forward.

Hint: Of course the user should not be able to move the Slider manually, but on the other side if you disable the Slider it doesn’t look good. I simply placed a 9-slice-image with transparent pixels on top of the slider.
How animation works if the App is minimized and running in the background see below.
begin edited: 2013-03-05
While this works and is looking nice – it’s a mis-use of the Slider. The user normaly expexts to drag a Slider back and force, what’s not possible here because the Slider is a progress indicator and set by the application. Lesson learned after some discussions with Cascades – Designers: never use a UI element in a wrong way – even if it works, it’s a brake of the rules.
In some other applications and also while loading the WebView of the About Page I’m uising a ProgressIndicator, but in this Utility app it should look different.
So I did a custom animation: a trolley with a box of tea is moving from left to right and below a counter displays the remaining time. I solved this with Sequential and ParallelAnimations and some more work at QTimer. I will write another blog on this – here you can see how it looks like now:

end edited: 2013-03-05
Hope you get an idea what you can do with Cascades animations and Qt Signals / Slots to create a cool UI / UX.
You need the details ? Come to one of my trainings.
Dialogs, SystemToast
Cascades provides some System dialogs – I already used many kinds of SystemDialogs, ProgressDialogs and SystemToasts in my OpenDataSpace app. Please take a look at the code in Github.
A typical SystemDialog looks like this one:

For the TeaTimer I added another usecase for a SystemToast: ‘Tip-of-the-Day‘
Every time the user starts the application, he/she will get another Tip-of-the-Day like this one:

This SystemToast has an Icon, Text and an OK Button. Clicking OK or doing something else will hide the SystemToast. From Settings the user can suppress these Tips. Using SystemToasts this way it’s easy to give your users some kind of help or additional informations.
Deliver and store data
It should always easy for users to start with your app. So it makes sense to deliver some data and enable the user to modify the data.
In this case I have some sorts of tea together with brewing times predefined. Cascades and JSON are working together very smooth, so my list of teas is stored as a JSON inside the assets folder of the app. This JSON datamodel looks like this:

To enable the user to change this list (add new entries, edit descriptions or brewing times) you have to copy this file from the assets folder (read-only) into the data folder of your app sandbox. so the data is hidden for the FilePicker and can only be accessed by the app and will be deleted from the phone if the app will be deleted.
Here you can see how I’m getting the data from JSON into the DataModel bound to the ListView:
void TeaTimerData::initTeaSorts() {
	QVariantList dataList;
	dataList = readDataFromJson();
	mTeaDataModel =
			Application::instance()->scene()->findChild<GroupDataModel*>(
					"teaSortsDataModel");
	if (mTeaDataModel) {
		mTeaDataModel->clear();
		if (!dataList.isEmpty()) {
			for (int i = 0; i < dataList.size(); ++i) {
				QVariantMap map = dataList.at(i).toMap();
				Tea* tea = new Tea();
				tea->setValues(map);
				mTeaDataModel->insert(tea);
			}
		}
	}
}
Because users will only change tea sorts seldom, I placed the ListView into the ApplicationMenu. the user can also mark one tea as his favorite, which will be selected after opening the app. at the main page of the app the user sees a drop down box where he/she can select the tea easy. description and brewing time are displayed as description.
Running in the background (SceneCover, Notifications)
Users shouldn’t have to wait for a task to be finished. While the Tea is brewing they should do other things and be notified when the Tea is ready.
To solve this we have to think about
- SceneCover: what should be visible if the App is minimzed
- Notifications: HowTo notify the User
Minimized Apps normaly display a scaled-down screenshot from your app – but it’s much better to design the minimzed View by yourself using a SceneCover.
SceneCovers can be used from QML: attach a ComponentDefinition:
ComponentDefinition {
    id: appCover
    source: "AppCover.qml"
}
The SceneCover itself is defined inside the source (in this case AppCover.qml):
SceneCover {
    property alias displayText: brewingText.text
    property alias displayColor: brewingText.textStyle
    property alias displaySource: imageBrew.imageSource
    content: Container {
        Container {
            layout: DockLayout {
            }
            background: Color.Black
            ImageView {
                id: imageBrew
                imageSource: "asset:///images/tea-timer-cover-stopped.png"
                verticalAlignment: VerticalAlignment.Center
                horizontalAlignment: HorizontalAlignment.Center
            }
            Label {
                id: brewingText
                horizontalAlignment: HorizontalAlignment.Center
                verticalAlignment: VerticalAlignment.Center
                translationX: 40
                translationY: -20
                multiline: true
                text: qsTr("Timer\nstopped")
                textStyle.color: Color.Black
                textStyle.fontSize: FontSize.Large
            }
        }
    }
}
You see we’re using an ImageView and a Label. SceneCovers are only refreshed every 30 seconds, so it doesn’t make sense to animate 8 Images as we have done running the APP in the foreground.
I’m using 3 different states only:
- TeaTimer stopped
- Tea brewing
- Tea is ready
as you can see here:

using the Properties (see QML code above) it’s easy to change the Image, Text and TextColor
Application.cover.displayText = qsTr("Tea\nready !") + Retranslate.onLanguageChanged
Application.cover.displaySource = "asset:///images/tea-timer-cover-ready.png"
Application.cover.displayColor.color = Color.Red
begin edited: 2013-03-04
Thanks to Staffan Lincoln (@stlin_tat ) I got some valuable input from a designer HowTo provide better looking SceneCovers.
- avoiding red color for text (Tea ready is a success – message and shouldn’t be in red)
- placing text on top of images isn’t recommended
- text as a one-liner is faster to read
There’s a Header Template described at UI Design Guidelines – I tried it and really: looks much better now:

The good thing: now it’s also easier to use this for the Q10 – layout (less changes needed).
Thanks Staffan ! (BTW: if you ever get a chance to attend a Designer + Developer session by Staffan Lincoln and Johan Larsby it’s really worth to go)
… submitted new version to BlackBerry World.
end edited: 2013-03-04
What about the Notification ? At first I tried to notify the user with QML-code only. Was no problem to create a Notification and notify the user.
Notification was also shown in Message HUB, but I didn’t found a way to add the InvokeRequest to the Notification from QML. InvokeRequest is needed if the User should be able to open the TeaTimer APP directly from the Notification inside the HUB – so I did it in C++:
void ApplicationUI::sendNotification() {
	Notification n;
	n.setTitle(tr("Your Tea is ready"));
	n.setBody(tr("Tap 'Open' from ActionBar to go directly to ekkes TeaTimer"));
	n.setCategory("vibrate");
	setInvokeRequestToNotification(n);
	n.notify();
}
void ApplicationUI::setInvokeRequestToNotification(
		bb::platform::Notification& notification) {
	mUsecase = Usecase::Notification;
	InvokeRequest request;
	request.setTarget("org.ekkescorner.ekkesTeaTimer");
	request.setMimeType("application/vnd.ekkescorner.teatimer");
	notification.setInvokeRequest(request);
}
don’t forget to add the required code in your bar-descriptor.xml. You should use a app-specific Mime-Type !
    <invoke-target id="org.ekkescorner.ekkesTeaTimer">
      <type>APPLICATION</type>
      <filter>
         <action>bb.action.OPEN</action>
         <mime-type>application/vnd.ekkescorner.teatimer</mime-type>
      </filter>
    </invoke-target>
Now from the Notification inside the HUB you can directly jump into your app.


Hint: Be a good citizen of BlackBerry10 and always clear effects and notifications if your APP exits – per ex. user closes from minimized app. I’m doing a manual exit because of this.
BBM
It’s a good practice to integrate BBM into your application. Using BBM it’s easy to tell others about the APP – so you get free advertising by your satisfied users.

I also included the Invite to BBM if users want to talk about your app with contacts not been connected via BBM.
And there’s another BBM – integration with ekkes TeaTimer: if Tea is ready and you want to tell this to your collegues / family / friends – it’s now so easy:
Here’s the code to tell others that the tea is ready:
Action in QML:
ActionItem {
    title: qsTr("BBM: Tea is ready") + Retranslate.onLanguageChanged
    imageSource: "asset:///images/chat.png"
    ActionBar.placement: ActionBarPlacement.InOverflow
    onTriggered: {
        app.shareTextWithBBM(qsTr("Fresh tea is waiting for you") + Retranslate.onLanguageChanged)
    }
}
Invocation from C++:
void ApplicationUI::startChat(const QString& text) {
	mUsecase = Usecase::BBM;
	InvokeRequest bbmRequest;
	bbmRequest.setTarget("sys.bbm.chathandler");
	bbmRequest.setAction("bb.action.BBMCHAT");
	bbmRequest.setData(text.toUtf8());
	mInvokeManager->invoke(bbmRequest);
}
and here’s the screenshot how it looks like:

InvocationFramework
We have already seen some parts of the app where I’m using the InvocationFramework. The InvocationFramework is one of the coolest things of BlackBerry 10 and I recommend to use it: your users will get a seamless way to solve their workflows without switching between apps. I also recommend that you provide functionality of your APPs to others, if this makes sense for your use-cases. If you’re thinking about this: please provide Cards where possible and not only Open or Share functionality. …and if you’re providing Cards, try to use Viewer – then users can “peek-back”. I know it’s a kind of re-thinking app-development and it’s not so easy to give away functionality from your app “for-free” to other developers, but it’s really worth thinking of it. (and doing it)
Now let’s see how I intergrated Foursquare as a 3rdParty app and Remember-Notebooks as a native BlackBerry10 OS – App. We have already seen above HowTo do some settings for this.
Foursquare (3rdParty APP integrated)
You’re on-the-go and want to get easy access to places where to buy tea or to drink a cup of tea.
We’re doing this with onVenueSearch() from Foursquare:
void ApplicationUI::onVenueSearchCard() {
	mUsecase = Usecase::FoursquareVenueSearch;
    InvokeRequest cardRequest;
    cardRequest.setTarget("com.foursquare.blackberry.venuesearch.card");
    cardRequest.setAction("bb.action.VIEW");
    cardRequest.setMimeType("venuesearch/foursquare");
    QUrl uri = QUrl("foursquare://venues/search");
    QString token = mTeaSettings->getValueFor(SETTINGS_KEY_FOURSQUARE_TOKEN, "");
    if(!token.isEmpty()){
    	uri.addQueryItem("oauth_token", token);
    } else {
    	uri.addQueryItem("client_id", mFoursquareClientId);
    	    uri.addQueryItem("client_secret", mFoursquareClientSecret);
	}
    QString foursquareQuery = mTeaSettings->getValueFor(SETTINGS_KEY_FOURSQUARE_QUERY, "");
	if(!foursquareQuery.isEmpty()){
		uri.addQueryItem("query", foursquareQuery);
	} else {
		uri.addQueryItem("query", "Tea");
	}
    cardRequest.setUri(uri);
    mInvokeManager->invoke(cardRequest);
}
If you take a look at the code: we’re doing a CARD request. If the user has connected our APP with the Foursquare APP we use the token – if not we’re using the ClientID and SecretCode we got from registering the app with Foursquare. Using the token Foursquare will present a more-user-specific query result.
If the user has added keywords for the query in Settings we also use this – otherwise we simply put ‘Tea’ in as query.
This Query will give us a list of Venues nearby:

This Card comes in as a Composer – so user cannot peek back. I already requested some wishes at this Cascades-Forum-Thread.
If the User clicks on one entry, we can open directly from our APP this venue in Foursquare APP, where user can do a Check-In.
// from CardDoneMessage:
JsonDataAccess jda;
const QVariantMap venueMap =
		jda.loadFromBuffer(doneMessage.data()).toMap();
QString venueId = venueMap.value("id", "").toString();
if (!venueId.isEmpty()) {
	onOpenVenue(venueId);
}
//
void ApplicationUI::onOpenVenue(const QString &id) {
	mUsecase = Usecase::FoursquareVenueOpen;
    InvokeRequest cardRequest;
    cardRequest.setTarget("com.foursquare.blackberry.uri");
    cardRequest.setAction("bb.action.OPEN");
    cardRequest.setUri("foursquare://venues/"+id);
    mInvokeManager->invoke(cardRequest);
}
Remember APP (Notebooks / Evernote integrated)
I’m already a long-time Evernote user and so I’m really happy that Evernote is one of the BlackBerry10 Notebook providers.
Using BlackBerry10 Remember APP and Evernote I can easy transport informations from my phone to my desktop.
I’m doing this if reading Tweets on-the-go and later on my MacBookPro I want to read again.
Inside ekkes TeaTimer I can easy write a Notebook entry to be remembered to buy some Tea.
Invoking this is again easy done:
void ApplicationUI::addNotebookEntry(const QString& selectedTea) {
mUsecase = Usecase::Notebook;
InvokeRequest request;
request.setAction("bb.action.ADD");
request.setTarget("sys.pim.remember.composer");
QString title = tr("Buy Tea");
QString description = tr(" is empty");
QString uri = "title=" + title + "&description=" + selectedTea + description;
QString lastEntry = mTeaSettings->getValueFor(
SETTINGS_KEY_NOTEBOOK_ACCOUNT_KEY, "") + ":"
+ mTeaSettings->getValueFor(SETTINGS_KEY_NOTEBOOK_KEY, "");
if (lastEntry.length() > 1) {
uri += "¬ebookid=";
uri += lastEntry;
}
QString tags = mTeaSettings->getValueFor(SETTINGS_KEY_NOTEBOOK_TAGS, "");
if (!tags.isEmpty()) {
uri += "&tags=";
uri += tags;
}
QString s = QUrl::toPercentEncoding(uri, "{}=&:,");
request.setUri("remember://notebookentry?" + s);
mInvokeManager->invoke(request);
}
most important is creation of correct URI. If user has selected a default notebook we add the AccountKey:NotebookKey, if user has added Tags, we add the Tags. Also the URI must be correct encoded !
The user gets this Page directly integrated into TeaTimer app without leaving the app:

Notebook (Folder) was selected, Title was set, also a description and the Tags. Wasn’t this easy ?
BlackBerry World Reviews (the easy way)
It should be easy for your users to leave a review for your APP at BlackBerry world.
HowTo integrate this:
void ApplicationUI::leaveReview() {
	mUsecase = Usecase::BlackBerryWorld;
	InvokeRequest bbWorldRequest;
	bbWorldRequest.setAction("bb.action.OPEN");
	bbWorldRequest.setMimeType("application/x-bb-appworld");
	bbWorldRequest.setUri("appworld://content/24367895");
	qDebug() << "leave review";
	mInvokeManager->invoke(bbWorldRequest);
}
Now the user will be directly sent to your AppWorld Page to leave his/her review:

Tip of the Iceberg
This is the end of my short walk through a small Utility App like a TeaTimer 😉
This was only the Tip of the Iceberg…

…but I hope you got some ideas for your own apps HowTo
- make them good citizens of BlackBerry 10
- follow the Cascades UI Design Guidelines
- give your users a seamless FLOW
- get satisfied users
- differentiate your BlackBerry 10 apps from other-platform-apps
Have fun.
Get the right trainings and relax
Writing Cascades APPs for BlackBerry 10 enables you to create awesome applications.
New to BlackBerry 10 ?
New to Cascades ? C++ ? Qt ? QML ?

I went the hard way through all the Betas from the early beginning of BlackBerry 10 and first Cascades Betas more then a year ago.
But I’m not sitting on my experiences and knowledge – you can participate: I’m writing blogs, articles like this one, speaking at conferences and there will be Cascades Workshops:

If you attend both workshops (Basic: 3 days + Experts: 2 days) you’ll be able to write applications like this one !
You’ll go home with sourcecode and tips and tricks.
If you’re not tired – there are even night-coding-evenings with beer and food that week !
Register here for the next training ! attend….

…and relax !
edit 2013-03-10: there’s a follow-up article TeaTimer and Q 10
47.855939
12.127960


